At 2 a.m. in 2017 I was clicking, not trading. Buy because it felt like up. Sell because it felt like down. I owed money to a man who counted interest by the day, and every morning the number was bigger, so I sat in front of the gold chart trying to fix a debt with a mouse. If you had asked me why I was in that trade, I could not have told you. That was the real problem. Not the loss. The not knowing.
I survived, and not because I found a magic setup. I survived because I stopped guessing and learned how to read gold XAU/USD as a repeatable process, in an order that runs from the big picture down to a single point where my risk was already decided before I entered. This post is the map of that whole method. Consider it your start here.
If you have opened the gold chart and felt that same fog, this is for you. I will walk you through the entire way I read XAU/USD, in order, at a high level. Each step gets a paragraph or two, and each one links out to a deeper post where we slow down and do the real work. This page is the map. The other posts are the territory.
Why order beats a good idea in no order
Most people learn trading backward. They hunt for the entry first and treat the bigger picture and their risk as things to add at the end, like salt. That order is exactly why they blow up.
Here is the truth I paid for. A trader who follows a plain process in the right order will, over time, tend to do better than a trader who has brilliant ideas in no order at all. A good guess cannot be repeated. You cannot summon it next Tuesday when you slept badly, you cannot explain it to anyone, and you cannot review it when it fails, because a guess has no parts. A process has joints, and joints can be inspected and tightened.
So the method is not a secret pattern. It is a sequence. Read it the same way every time, and your decisions start coming from the steps instead of from your mood. Let me show you the sequence, top to bottom.
Step 1: Read the mood before the chart
Before my eyes land on a single candle, I spend a few quiet minutes on one question. Not “where is price going,” because that has no reliable answer. The question is, what mood is the market in today, and which forces are leaning on gold right now.
Gold does not really have a price. It has an argument. The dollar leans on it, real interest rates lean on it, and fear or calm leans hardest of all. That is why the exact same headline can shove price up on Monday and down on Wednesday. The number is not a push, it is a surprise against what the room expected, and then the room decides how to feel about it. Your job is not to predict the reaction. Your job is to read the mood, then size your risk so a wrong read is survivable.
Where this fails: context is a weather report. It tells you to bring a coat. It does not tell you which street to walk down. Trade off mood alone, with no structure and no defined risk, and you will still lose, just with more confidence. That is the dangerous kind of losing.
Step 2: Read structure from the top down
Now the telescope comes down to the chart. The first time I truly misread gold, I did it with total confidence on a five minute chart. Price was climbing in neat little steps, so I bought. What I could not see, because I never zoomed out, was that on the higher timeframe price was sliding lower inside a much bigger move. My tidy uptrend was only a pause on the way down.
That is why structure comes before everything on the chart itself. You start big and work small, letting the higher timeframe set the story so the lower timeframe cannot lie to you. You learn to see where gold is making higher highs or lower lows, where a trend is still intact, and where it has quietly broken. Get the direction of the big move first, and the small moves finally sit in context.
Where this fails: structure can look clean and still flip on one violent candle, and a lower-timeframe pattern can fool you into fighting the bigger trend. That is exactly why we read it top down, not bottom up. The full walkthrough is here: reading gold market structure, BOS and CHoCH.
Step 3: Mark the zones that matter
Structure tells you the story. Zones tell you where the story tends to turn. These are the areas on the chart where gold has reacted before, the places buyers or sellers showed up in size and left a footprint. You are not drawing lines everywhere. You are marking a small number of areas where price has a history of caring, so you know where to pay attention and where to stand back.
A zone is not a magic wall. It is a neighborhood, not an address. Price can wick straight through it, tap it and reverse, or ignore it completely on a loud day. The point of marking zones is not to predict a bounce. It is to know in advance where a reaction would actually mean something, so you are not reacting to random candles in the middle of nowhere.
Where this fails: zones give a lot of traders false comfort. “Price is at support, so I buy” is not a plan, it is a hope. A zone only earns a trade when other things line up with it, which is a later step. We go deep on drawing and grading them here: supply and demand zones on XAU/USD.
Step 4: Bring in the session
Gold trades almost around the clock, but it does not breathe evenly. When London wakes up, volume pours in. When New York opens and overlaps London, that is the loudest part of the day. Asia is usually quieter. The same setup at the same zone behaves very differently depending on who is awake to trade it.
So time of day is a force, not a background detail. A clean level in a dead Asian hour may just drift. That same level in the London to New York overlap can move fast and mean it. Knowing the session tells you how much respect to give a move and how much room to expect.
Where this fails: sessions are tendencies, not a clock you can trust blindly. A major news release can make a quiet hour explode, and a loud session can chop sideways and trap everyone. Session context sharpens your read, it does not guarantee it. Here is the full breakdown: trading gold by session.
A quick pause. If this order is landing for you, I made a one-page checklist that walks these steps in sequence, from context to trigger. It is called The Gold Read Card, it is red and white, and it is a free download, no strings. Keep it beside your chart while the habit is still new. There is no rush to grab it, but it is there if you want it.
Step 5: Look for confluence, not a single reason
Here is where the earlier steps come together. Confluence is when several honest reasons agree in one place at one time. Structure says the bigger move is up, a demand zone sits just below, and the session is active. When those stack, the spot is worth watching. One reason on its own is a coin flip with a story attached.
But I have to warn you about the trap, because it is the one that got me most. There is real confluence, and there is fake confluence, which is just you stacking three ways of saying the same thing and calling it three reasons. Or worse, hunting the chart until you find enough lines to justify a trade you already wanted to take. Confluence is supposed to make you slower and pickier. Used wrong, it makes you feel certain, and certainty is expensive.
Where this fails: no amount of confluence makes a setup safe. Aligned reasons raise the quality of the decision, they do not remove the risk. We cover real confluence and the trigger that follows it here: gold confluence and the trigger.
Step 6: Name the loss before anything else
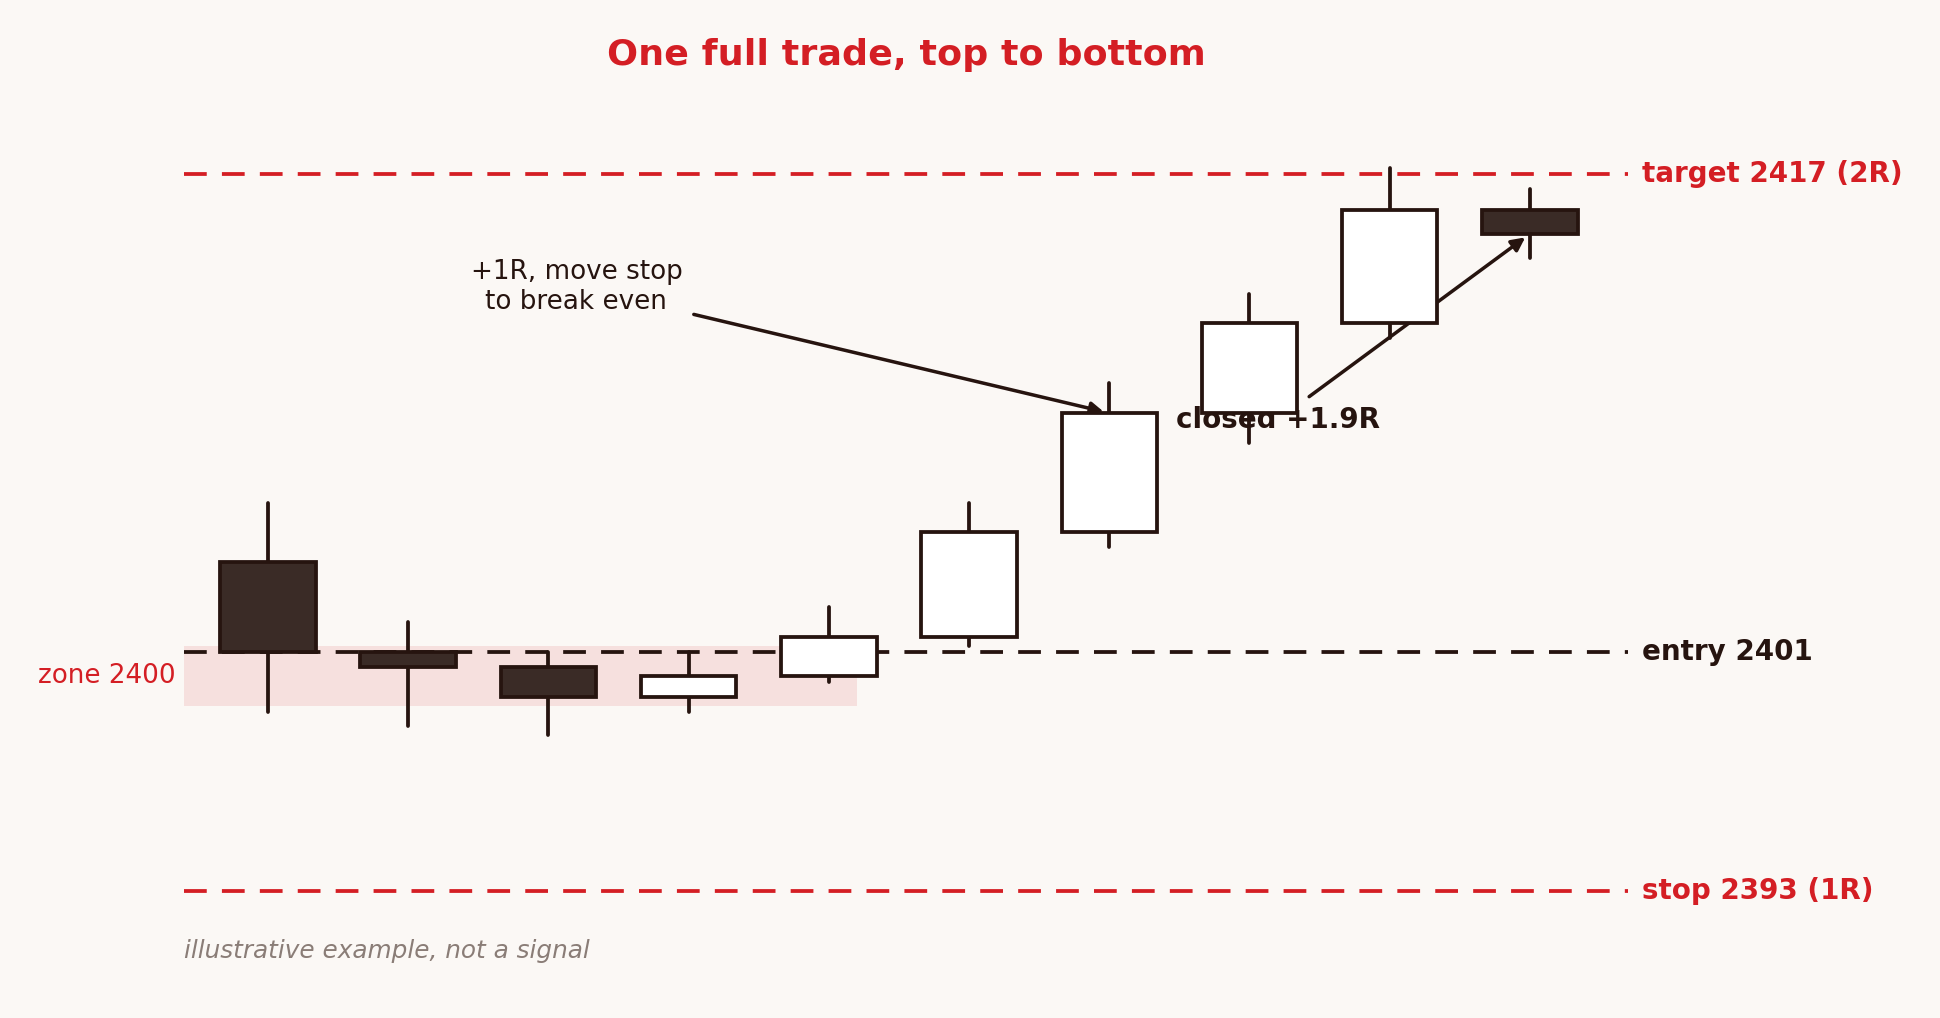
Now, before the entry, comes the step that saved my account. I decide how I am wrong before I decide how I might be right. I name the exact place my read is broken, I set the stop there, and I size the trade so that if the stop hits, the loss is small enough that I could sleep on it.
Think of it like driving. Before a driver touches the gas, they know where the brakes are. Not while they are already sliding toward a wall. Before. Your entry, your analysis, your beautiful reasons, all of them can be wrong. The only part of a trade you fully control is how much you are willing to lose. So you decide that part first, while you are calm, before the trade can grab your emotions. As one way to picture the thinking, some traders cap the loss on any single trade at a small percentage of the account, small enough that a loss would not change their week. That is one approach to sizing, not a rule I am setting for you, and not a promise about your results.
When risk is decided first, something surprising happens. You get a little freer. A loss becomes a cost of doing business, like a shop paying for electricity, not a personal insult. And a trader who is not terrified can actually think.
Step 7: Wait for the trigger, then enter
Only now do I look for a reason to actually click. A trigger is the small confirmation on the lower timeframe that says the zone is doing what I hoped, right now, in real time. It is the difference between “price is near my level” and “price is reacting at my level the way I expected.” Without a trigger, you are guessing that the zone will hold. With one, you are responding to evidence.
The entry itself should be almost boring by this point. Big picture checked, structure read, zone marked, session weighed, confluence honest, risk named, trigger seen. You are not deciding whether to trade at the entry. You already decided the conditions upstream. The entry is just the moment those conditions finally showed up.
Where this fails: a trigger can be a fake-out. Price can give you the exact signal you waited for and then reverse straight through your stop. That is not a broken method, that is trading. It is also exactly why the loss was named and sized in the step before this one, so a false trigger costs a little, not a lot.
Step 8: Manage the trade, then journal it
The trade is on, and now the job is to manage it without falling apart. That means following the plan you already wrote instead of the feelings arriving live. Where do you take partial profit, where do you move the stop, when do you simply let it run to your level, and when do you get out because your reason is gone. Being wrong is part of this. The goal is not to avoid losses, it is to lose the way you planned to.
Then, when it is closed, you write it down. What you saw, why you acted, where your risk sat, and what actually happened. A loss you can explain is a lesson. A loss you cannot explain is just pain. The journal is the step that turns a hundred trades into a skill instead of a hundred separate feelings. It is also the only honest way to find out which step in your own process keeps failing.
How to read gold XAU/USD, the whole map in one breath
Read the mood, read structure top down, mark the zones, weigh the session, check for honest confluence, name the loss and size it, wait for the trigger, enter, manage, journal. That order is the method. Not a pattern. A sequence you can run when your hands are cold and your head is loud.
None of these steps is safe on its own, and I have shown you how each one can turn on you. That is on purpose. A method that only describes its own strengths is not teaching you, it is flattering you.
If you want the long version of all of this, I wrote a book called Reading Gold: A Repeatable Method for XAU/USD. It walks this exact order, one chapter per step, with the traps spelled out. And if you would rather just read a chart quietly on your own tonight and practice the order on paper with no money on the line, that is a good path too, maybe the better one for you. I mean that.
HARCOS INVEST FX is where I read gold out loud with other traders who show their work, including the losing and cancelled trades. The door is open if you ever want to walk through it. No last chance, no secret setup behind a paywall. Come read with us when you are ready, or grab The Gold Read Card, print it, and walk the steps once tonight.
Trade the process, not the guess.
FAQ
What does “how to read gold XAU/USD” actually mean?
It means having a repeatable way to look at the gold chart, from the big picture down to a defined-risk entry, so you can say out loud why you are in a trade, why you are staying out, and where your plan can still fail. It is a reading process, not a prediction.
Do I have to follow the steps in order?
At least the first time, yes. The order is the method. Big picture before structure, structure before zones, and risk named before the entry. Skip the order and you tend to find the entry first and justify it backward, which is how a lot of accounts get hurt.
Why decide risk before the entry instead of after?
Because your analysis can be wrong, but the size of your loss is the one thing you fully control. Decide it while you are calm, before the trade can grab your emotions. A named, small loss keeps you thinking clearly. A loss you size in a panic does the opposite.
Is this a way to win consistently?
No, and be careful of anyone who says their method is. A process does not hand you a win rate. It gives you consistency of decision. You will still have losing trades. The point is to stop having losing habits, and to lose in a way you can explain and review.
About the author
My name is Marcus, founder of HARCOS INVEST FX. I did not come from money or a trading desk. I came from a bad year and a loan I could not pay, and in 2017 I blew up a gold account while already in debt. What saved me was boring. I put risk first and built a process I could repeat when I was calm and, more importantly, when I was not. HARCOS INVEST FX grew out of that, a community of gold traders who care more about surviving and improving than about looking like geniuses online. I am a trader who kept records and kept going. I am not a guru, and I will never tell you I found a way to get rich fast. I would rather read gold alongside you than sell you a shortcut.
Risk note: trading gold (XAU/USD) is high risk and is usually leveraged, so losses can be fast and can exceed your deposit. This post is education, not personal financial advice. Risk only money you can afford to lose.